Fun Fact: There are approximately 1000 worms in a pound!
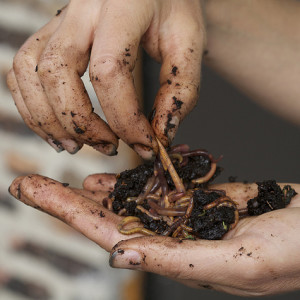 Why Compost With Worms?
If you live in an area with extreme cold or heat, you may want to move your composting efforts inside. One of the best ways to do this is with vermiculture or worm composting. One of the advantages of worm composting is that it can be done indoors and outdoors, which allows you to compost all year round and gives you apartment dwellers a method of composting. The only trouble with this method is that you won’t be able to take advantage of the fall leaf drop with this technique. Worm bins are for relatively low volume situations.
What Is Worm Composting?
 Worm composting is a composting method that uses specialized worms to break down your food scraps and turn them into rich, dark, earthy compost or worm castings. Worm casting are actually just a fancy way to say worm poop.
What Is So Great About Worm Castings?
Worm compost has all the same benefits are traditional compost does. Worm castings are rich in humic acids which improve the soil structure and help make micro-nutrients available for plants to use. Worm castings contain five times more nitrogen, seven times more phosphorus and 11 times more potassium than average garden soil. Another great thing about worm composting is that you don’t have to turn your “pile”; the worms do it for you.
Where Should I Put My Worm Bin?
Your worm bin needs to be kept somewhere that the temperature will remain between 40˚F and 80˚F all year round. Red worms generally prefer temperatures in the 55˚F to 77˚F range. This can be inside, in the kitchen, the pantry, the garage, a shed or the cellar. You can also keep it outside in the shade under a tree or on a porch. They need to be kept out of the hot sun, heavy rain and cold.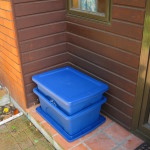
Worms do not like a lot of noise or vibrations, so keep them away from high traffic areas.
Prefabricated bins do not take up much space, about 2×2 ft square, and home made one’s are as large as the plastic tote you decide to use.
Just How Big Should My Worm Bin Be?
Mary Appelhof auther of Worms Eat My Garbage suggests weighing your kitchen scraps for one week (in pounds), then providing one square foot of surface area per pound. The depth of your bin should be between eight and twelve inches.
If you produce a lot of kitchen waste then you should consider a second bin. You could also use an “overflow” bucket (for extra kitchen waste), so you can throw in later, or put out in your traditional compost bin. This way you can adjust the amount of food you give the worms and give them a consistant amount each day.
You also may consider moving outdoors with a larger bin. The larger the bin the easier it is to manage. For example, a large outdoor bin say 5X3X2 feet will have a lot of room for worms and food scraps. The population of worms will adjust itself to match the amount of food available and if there are unfavorable conditions in one area of the bin, the worms will just move to another more favorable area.
What Kind of Worms Should I Get?
Most yard worms ar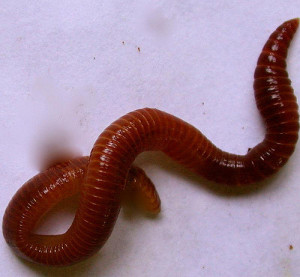 e of the “anecic” type – that means they are soil dwelling worms that create burrows and tend to lead a somewhat solitary existence (they need their space). You can think of them as night crawlers or traditional earthworms. The worms ideally suited for composting on the other hand are referred to as “epigeic”. These worms tend to live in rich organic material (not soil), and have adapted to crowding and warmer temperatures. In other words, you should not try to use worms from your yard, you should purchase some worms from a dealer.
If you need a dealer in your area check out this detailed Worm Supplier Directory.
The most common type of worm sold for your worm bin is the Eisenea fetida, also known as the red wriggler or branding worm. Aside from being reddish in color, one of the distinct features of the worm is the yellow tip of the tail. You could also use the Lumbricus rubellus, also known as the manure worm. Manure worms, red worms, and branding worms are great at decomposing organic matter—especially kitchen scraps.
Another option is to ask someone else with a worm bin if they’ll share with you. Many home vermiculturist got started this way and are happy to ‘pay it forward’. So, get in touch with your local gardening clubs and ask them if they have worms to share.
Reproductive Cycle Of Worms
Worms live for about one year in a worm bin. When a worm dies in your bin, you probably will not notice it, since the worm’s body is about 90% water. They shrivel up and become part of the compost. Worm death is not a problem though, because new worms are born to replace them.
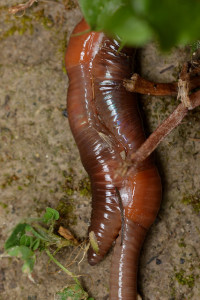 Worms are hermaphrodites, which means they are both male and female at the same time. However, in order to reproduce, they still need a mate. Both worms line up in opposite directions and attach to eachother near their band (or clitellum), which contains some of the reporductive organs. The worms stay attached for about 15 minutes while they exchange sperm cells. Several days later the eggs come in contact with the sperm cells and form a cocoon. Then the worms “lay” the cocoon which holds 2-5 eggs.
The baby worms will hatch from their eggs and live in the cocoon for at about 3 weeks, sometimes longer depending on the surrounding conditions. When the baby worms sense the environment is warm enough, they will crawl out of the cocoon. At this stage they are the thickness of a piece of thread and about 1/4 inch long. At first the baby worms appear white until they have enough blood to turn them pink.
Red worms can lay two or three cocoons per week which will hatch in 21 days. Each cocoon hatches two or three worms that will mature in 60 to 90 days. Provided you give them adequate food and a good home, you can double their population every 90 days.
What Kind of Bin Should I Use?
Worm bins are typically made of wood or plastic and come in all different sizes. I’ve seen bath tubs, wooden boxes and plastic totes all used for worm bins. Just make sure that you have a container large enough to accomidate the surface area required per our discussion earlier. You also, want your container to be at least 8 to 12 inches deep with some sort of drainage holes in the bottom for the compost tea.
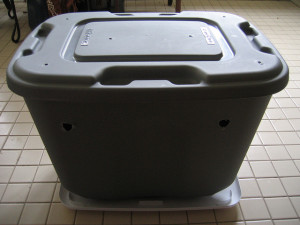
Don’t forget that worms like a dark, moist (not wet) environment and they hate light. Any container should be opaque. Red wiggler worms (and earth worms in general) are very sensitive to direct light – it can lead to considerable stress and even death if they unable to escape from it.
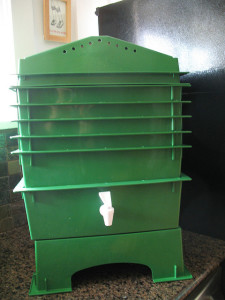
If your just starting out, I highly recommend a worm tower like one of the following:
The Worm Factory® 4-Tray Recycled Plastic Worm Composter – Black Item # HN-CAD002
VermiHut 5-Tray Recycled Plastic Worm Composter – Black Item # HN-VTK007
They don’t take up much space, they make it easy to harvest and have a spigot on the bottom for easy access to your compost tea. Well worth the money.
Building A Worm Bin
If you prefer, you can also build your own worm bin or worm bin tower. Wood is a great building material if you are handy, but plastic totes are easier to work with and clean. Below are the instructions to build your own worm tower out of plastic totes, bins or storage containers.
Materials needed to make an easy to harvest worm bin:
- Two 8-10 gallon plastic totes (opaque so light cannot pass through them) as shown in pictures Cost: about $5 each
- Drill (with 1/4″ and 1/16″ bits) for making drainage & ventilation holes
- Newspaper
- One pound of red wiggler worms.
Step 1 – Create Drainage
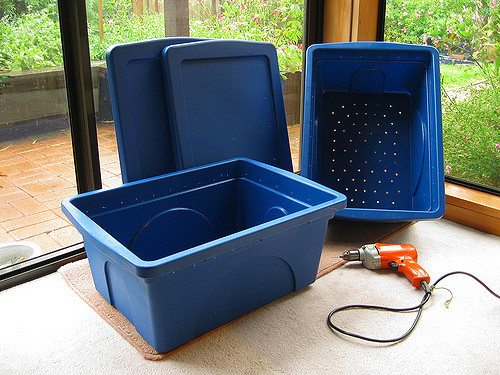
Drill about 100 evenly spaced 1/4 inch holes in the bottom of each bin. These holes will provide drainage and allow the worms to crawl from one bin into the next when you are ready to harvest the castings. If contents get too wet you may need more drainage, try drilling more holes.
Step 2 – Create Ventilation
Drill ventilation holes about 1 – 1 ½ inches apart on each side of the bin near the top edge using the 1/16 inch bit. Also drill about 30 small holes in the top of one of the lids. Don’t drill holes in both lids! One is going to be used to collect a liquid by-product or leachate, called compost tea.
Step 3 – Assemble Your Bin
At this point you should have two bins with holes in them and one lid with holes in it. We will only need one of the bins to start with and both lids. The non holey lid goes upside down on the floor to collect your compost tea. The other goes on top of the bin or tote. If you haven’t guessed already the tote will go on top of the lid on the floor. It is also advisable to put a spacer of bricks or something between the bin and the lid tray, to help it drain.
The second bin will go inside the first bin once the worms have finished composting the first bin. You will switch the lid to the new bin and the worms will crawl out of the first bin up into the second bin. You can then harvest the compost from the bottom bin and switch the bins.
Remember to place your bin in a quite, dark place with a consistent temperature as we discussed above.
What Goes Into My Worm Bin?
Worms need moisture, air, food, darkness, and warmth. The bedding should be high in carbon and be able to hold moisture. A bedding made of newspaper strips or leaves will hold moisture and provide space for the air that your worms need.
Step 4 – Prepare Your Bedding
Prepare bedding for the worms by shredding newspaper or brown cardboard into 1 inch strips. If you have any old leaves or leaf litter, they can be added also. Worms love leaves. Do not use magazine paper or paper with color ink and if you use cardboard, make sure to remove all tape and staples.
Worms need bedding that is moist but not soggy (about 60% moisture), so moisten the newspaper by soaking it in water for several hours. Then squeeze out the excess water before adding to your bin. If you can squeeze a handful with only a few drops coming out, then the amount of moisture is about right.
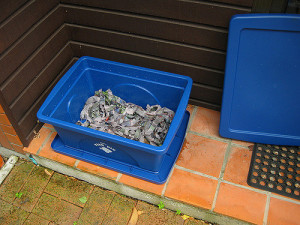 Cover the bottom of the bin with 6 to 12 inches of moist newspaper, fluffed up. You don’t want to go much deeeper than that, because the worms like to live near the surface. As the bedding breaks down it will take up less space, so you can a little extra if you like. However, don’t fill your bin higher than 2/3rds full.
Fluffing or tossing the bedding is important to create air spaces for aerobic bacteria, odor control, and to give worms room to move around.
Throw in a handful of dirt, or fine sand for “grit” to help the worms digest their food. Worms don’t have teeth. They actually have a gizzard and depend on the rocks in the soil to help the “chew” their food. You can also use crushed egg shells for this.
Do not add fresh cow, horse or chicken manure into the bedding. These emit gasses and could raise the temperature of your compost bin and cook your worms to death.
Step 5 – Add Your Worms
Add your worms by pushing aside the bedding, setting the worms in the hole and gently covering them up. They will dispurse themselves around the bin on their own. Remember, you only need one pound of worms to start. They will multiply and regulate their population based on the amount of food you provide them.
Step 6 (optional)
To help your worms feel more comfortable you can cut a piece of cardboard to fit over the bedding, but inside the tote/bin. Then get it wet and cover the bedding with it. The worms love to eat cardboard, and once it breaks down you can replace it.
Step 7 – Feeding Your Worms
Feed your worms slowly at first. As the worms multiply, you can add more food. Use that overflow bin we discussed early to help regulate your feedings.
Feed your worms by gently burying the food in a different sections of the bin each week. Under the cardboard of course. The worms will follow the food scraps around the bin. Burying the food scraps will help to keep fruit flys away and keep the smell down.
It’s best to feed your worms once a week in small amounts. If you feed them more than they can process you will end up with a stinky compost bin as the garbage literally backs up.
What do worms like to eat?
Often people assume that the worms eat the food waste itself, but actually they slurp up the microbial slime that forms on the surface of the rotting material. Therefore, the worms won’t be able to start processing your food waste until it starts to rot or break down. To jump start this process, you can mix in a handful of finished compost. The bacteria, fungi and other organisms in the compost will contribute to the degradation process.
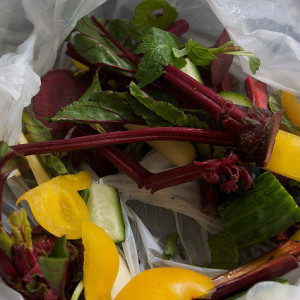 Since worms eat the decaying fruit & vegetables and the bacteria, feed your worms a vegetarian diet. The more vegetable matter the better.. While leftover dairy products, oily foods and meat products do degrade, they can produce odors and attract pests, so they should be avoided in a worm bin. Food scraps such as fruit and vegetable peels, pulverized egg shells, tea bags and coffee grounds work best.
Experts are divided on whether pasta and grains should be tossed in with your worms or thrown away with the regular garbage. I suggest that you experiment and let your worms tell you what they will eat or will not eat.
Avoid orange rinds and other citrus fruits that are acidic, they can increase the acidity of the bedding and irritate your worms.
You may want to avoid onions and broccoli because they tend to have a strong odor.
Also avoid common sense things like glass, plastic, rubber bands, staples, sponges and aluminum foil.
How Much Do Worms Eat?
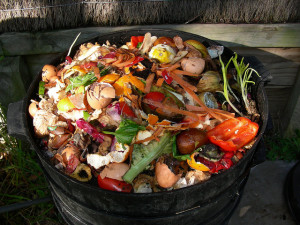 In general worms can eat about half their weight in food each day. To consistantly feed your worms, collect your food waste in a covered container, compost crock or “overflow bin”. Then add the food to different parts of the bin every couple of days. Start off slowly, adding just a few handfuls each time. If you see food that hasn’t broken down consider feeding less. If you can’t find any non broken down food, consider feeding more.
Remember, worms do not eat the food itself, but the rotting food on the surface. Your worms may eat smaller pieces of food faster, since it will have a larger surface area by weight. For example a whole apple will take much longer to eat, than a chopped up one. Just like with traditional composting.
Harvesting Compost
It should take about 4 to 6 months for the worms to get through a single bin. You’ll know its time when the bin is full and there are no recognizable food scraps.
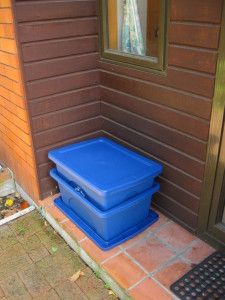 Start your harvest process by putting fresh bedding into the second bin using the same process we used in Step 4.
Then place the bin directly on the compost surface of the first bin as I mentioned earlier in Step 3. Bury your food scraps into the new bedding in the second bin. In one to two months, most of the worms will have moved up out of the bottom bin into the second bin in search of food.
At this time you can remove the bottom bin and make your second bin your new bottom bin. Now the first bin will contain mostly worm free compost. If you find any worms you can either leave them, or remove them and put them back into your active bin.
Using worm compost
Treat your worm compost like you would traditional compost. You can use it right away. It can be mixed with your potting soil or used in the garden as an amendment. You can use it in “Mel’s Mix”, which is 1/3 compost, 1/3 peat moss, 1/3 vermiculite or perlite. You can also use worm compost as mulch for your indoor and outdoor plants.
Harvesting Tea
A natural by-product of worm composting is the production of a liquid leachate, also known as Compost Tea or Worm Tea. When you are doing the bin swap, take a moment to dump the excess liquid from the bottom lid into a bucket. This “worm tea” is a great liquid fertilizer and can be used like compost tea.
Moisten Bedding As Needed
Your bedding should be about as moist as a well wrung out sponge. Check your bedding when you feed your worms to determine if they need more moisture. Moisten gently with a spray bottle or watering can. If the bedding is wet, add some more paper bedding to soak up the excess.

For more organic gardening tips and a FREE copy of my book 221 Tips & Tricks from Master Gardeners Illustrated! subscribe here:
Trouble Shooting Your Worm Bin
 Fruit Flies
Fruit flies are the most common pest in a worm bin. They are attracted to yeast and rotting fruit. To help reduce your fruit fly problem, make sure that when you add your food waste you bury it al least 2 inches below the bedding.
If the problem is persistent the best thing to use is and organic pesticide that only effects the flies. The pesticide I am referring to is BTI, which is a naturally occurring bacteria that attacks fly larva. Just sprinkle some BTI granules to the bin every couple of weeks and gently water it in.
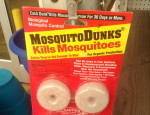 You can find BTI at your hardware store. It usually comes in the form a donut shaped dunk labeled for mosquito control. Just break up those dunks and add the granules. This will also work for fungus gnats.
Bad Odors
Worm compost usually does not smell. Any foul odor would come from rotting food that the worms have not eaten yet or from a build up of anaerobic bacteria which release smelly gasses.
To know which problem your having, first test the moisture level by squeezing it. If more than a few drops of water come out, your bedding is probably too wet. This is the cause of your anaerobic bacteria build up and the smell. See below section “Bedding Is Too Wet” for solutions to this problem.
To find out if you are over feeding, uncover the food waste you placed in the bin last. If you can recognize a large amount of uneaten waste, then you are probably overfeeding.
If this is the case, stop adding food waste until the worms have broken down what they have. Then, try giving them less and chop it up into smaller pieces before giving it to them. This will help them eat the food before it starts rotting (and smelling.)
You can also fluff up your bedding again to make sure it is getting enough oxygen. This will inhibit the stinky anaerobic bacteria and encourage the not so smell aerobic bacteria.
Bedding Is Too Wet
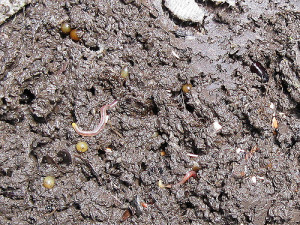 If the bin is too wet, the composting process may produce anaerobic bacteria which release smelly gasses. You’ll know that you have this problem if you can squeeze the bedding and more than a few drops of water come out of the bedding.
If you your bedding is too wet you can add some dry bedding to help absorb some of the moisture. I also, suggest drilling a few more holes in the bottom of your bin to help with drainage.
My Worms Are Crawling Out!
If the worms are sensing that their environment is to hostile, they will leave. If your bedding has become too acidic or wet your worms will migrate to a better place. Your bedding can become too acidic if you add too many acidic food scraps such as orange peels. You can reduce the PH by sprinkling some some ash into you bin. Also, you may want to reduce the amount of acidic organic matter that you put into your bin.
Your Turn
Get out their and make yourself a bin and leave a comment below telling us about it. What bin did you choose? Where did you get your worms? How much are you able to feed them? We’d all love to hear from you.
References
>http://www.dec.ny.gov/docs/materials_minerals_pdf/compost.pdf
http://www.compostsantacruzcounty.org/Home_Composting/Worm_Composting/worm_harvest_soil.htm
http://compost.css.cornell.edu/worms/basics.html
http://www.homecompostingmadeeasy.com/wormcomposting.html
http://www.redwormcomposting.com/getting-started/
http://whatcom.wsu.edu/ag/compost/easywormbin.htm
http://dnr.wi.gov/org/caer/ce/eek/earth/recycle/compost2.htm
http://www.gardensalive.com/category/you_bet_your_garden#


Thank you so much for posting this very informative page. I will be getting my worms in 5 days, I was starting to wonder if I should have ordered them because I have no idea what I’m doing. Thanks to your page, I feel like I have the information I need to be successful at raising my worms. I read over other websites but NONE were in detail like this. I am bookmarking this page so I can come back if I need to if I have a problem. Thanks again.
Glad to help. Good luck!